The internet is made up of IP addresses that can either list the location of your home computer when you’re getting remote support or direct you to your favorite website. These numbers are like your online street address and help browsers find where they’re going.
watch the video > https://youtu.be/H75X38ETA5s
But if we had to type in a string of numbers, like 104.112.164.65, instead of “amazon.com” when we wanted to buy something, it would be much more difficult to get where we were going online. DNS servers were made to act as the translator.
The Domain Name System (DNS) translates the name.com that you enter into your browser into the IP address that will take you to the website, making the world wide web function as we know it.
So, why would you ever want to change your DNS server settings?
Not all DNS servers are the same. Some of them are faster than others, and some are more problematic. If you happen to have one that’s problematic it can mean slower connections, especially on those pages that are pulling in advertisements coming from multiple domains.
Where Do You Get Your DNS Server?
The DNS server that your computer is using isn’t something you typically choose when you set up your PC. Most people don’t even know where that domain name translation is being done.
A majority of people have the DNS servers that are supplied by their internet service provider (ISP) and just stay on that, never realizing they have the option of switching to a faster one that could significantly speed up their internet browsing.
What Can Switching your DNS Settings Do?
There are a number of reasons for switching your DNS settings to use another server for resolving internet URLs and IP addresses, speed is just one of those.
Some public DNS servers can be 5x faster at queries than others.
Here are several reasons that you may want to point your DNS settings to another server at home or work:
- For faster browsing
- For security to obscure your IP address
- To take advantage web filtering business features
- For parental control features
How to Update Your DNS Settings in Windows 10
Windows 10 has three different ways that you can change your DNS server settings that are fairly straight forward. We’ll explain each below.
Option 1: Use the Settings Application to Change your DNS Servers
Start by opening your Windows settings and going to Network & Internet.
If you want to change your Wi-Fi network, click Wi-Fi.
OR
If you want to change your Ethernet network, click Ethernet.

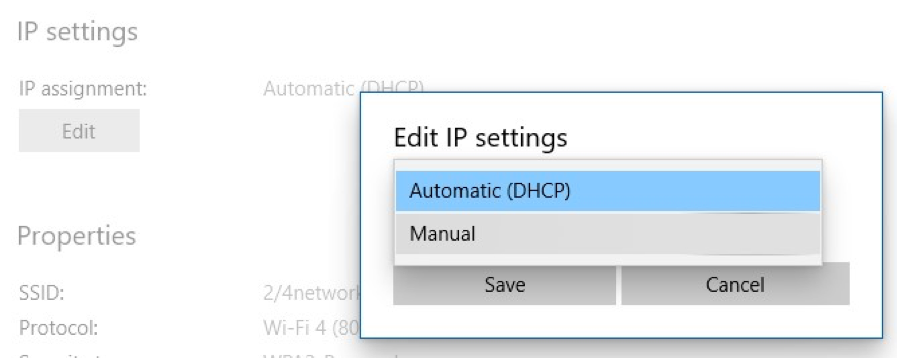
Tap on the name of your network. (In the case of the image above, you’d click on “2/4network.”)
Scroll down to the area that says IP settings, and under IP assignment click the Edit button.
Choose Manual from the drop down

Now you’ll see a dialogue box for the IP settings, and you’ll want to make sure the IPv4 switch is on.
Scroll until you see the Preferred DNS and Alternate DNS fields. These are where you can enter the IP address for the DNS servers you would like to switch to.
As an example, if you used Google’s public DNS servers, you’d enter:
- Preferred DNS: 8.8.8.8
- Alternate DNS: 8.8.4.4
Click the Save button and restart Windows to apply the changes.
Option 2: Change DNS Settings in the Adapter Options
Begin in a similar way by going to your Settings and Network & Internet area.
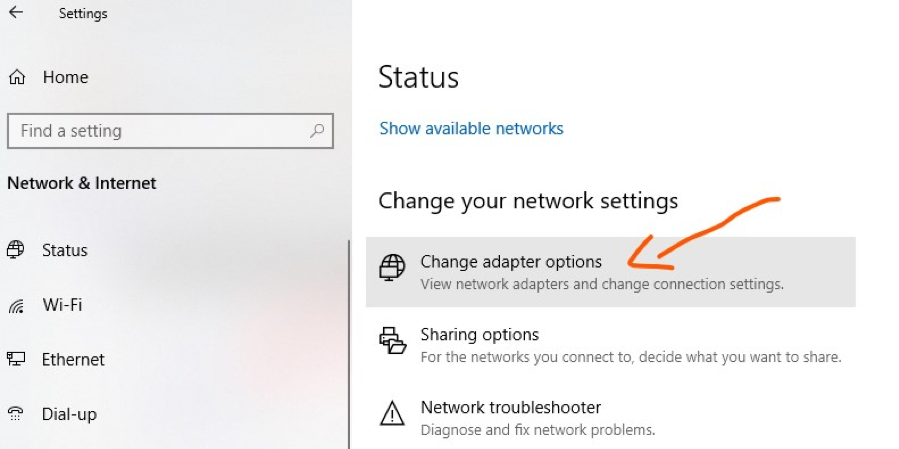
This time, instead of clicking on your Wi-Fi or Ethernet, you’ll look in the right-hand area of the panel for Change your network settings and click Change adapter options.

You’ll see a list of all your network connections, which will include any ethernet, Bluetooth, or Wi-Fi networks.
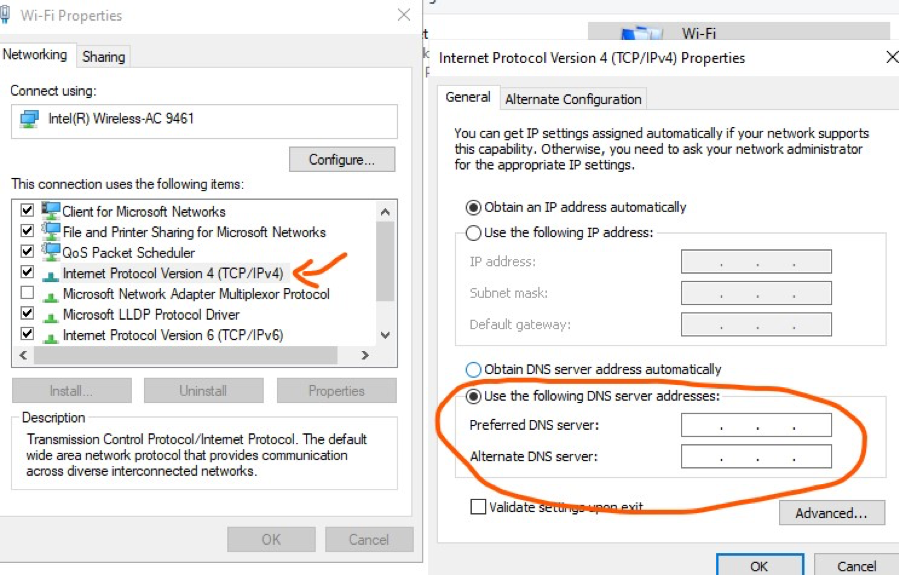
Right-click the network you want to change the DNS servers for and choose Properties from the drop-down menu.
Look for “Internet Protocol Version 4 (TCP/IPv4)”, highlight it and click the Properties button.
In the next screen click the button that says, “Use the following DNS server addresses:” and input your desired DNS servers.

Click Save and Okay where asked and restart Windows 10 to apply the new DNS server settings.
Option 3: Change DNS Settings from the Command Prompt or PowerShell
If you’re more comfortable using command lines rather than going through the Settings interface, you can also change your DNS server settings from either the Command Prompt or Windows PowerShell.
Open the one you prefer and make sure you’re signed in as an administrator.
Type in: netsch (press Enter)
Type in: interface show interface (press Enter)
You’ll see all the network connections enabled on your Windows 10 computer. Look for the one you want to change (it would be your Wi-Fi or Ethernet), it should show as “Connected” under State.
You’ll be using the Interface name in the next command.
Type in: interface ip set dnsservers “Interface name” static [DNS server IP address] (press Enter)
In the line above insert the name of your network adapter, which is listed in the prompt as the Interface name, in between the quotes, and instead of [DNS server ip address] type in the IP address of DNS server you want to use.
For example, if your interface name is Wi-Fi and you want to use the Google DNS server, you would type:
interface ip set dnsservers “Wi-Fi” static 8.8.8.8 (press Enter)
Once you hit Enter, the DNS server is changed, and you can close out.
Need Help Speeding Up Your Computer?
Slow internet browsing due to poor DNS servers is just one of the many things that can slow your computer down. Need a PC tune up? Mangnify247.com can help clean your PC and get it back up to speed.


